
Uncategorized
The Importance of Leak Testing: How to Use the EK-Loop Leak Tester Flex
03
Mar
Mar
Welcome back to the FTC Watercooling blog! If you’re reading this, you probably already know that building a custom water-cooled PC is one of the most rewarding projects a hardware enthusiast can take on. The temperatures drop, the aesthetics are unmatched, and the silent operation is glorious.
But let’s address the elephant in the room: water and expensive PC components don’t mix. A single loose fitting or pinched O-ring can turn your dream build into an expensive paperweight. That’s why leak testing isn’t just a recommendation—it’s a necessity. Today, we’ll cover why you need to test your loop and how to do it safely and efficiently with the EK-Loop Leak Tester Flex.
Why Leak Testing is Non-Negotiable
In the old days of custom watercooling, leak testing was a nerve-wracking, 24-hour ordeal. You would fill your system with coolant, unplug your motherboard, jump your power supply to run only the pump, and lay down paper towels everywhere. Then you waited. If a leak occurred, you had a wet mess to clean up, components to dry out, and a loop to drain before you could attempt a fix.
Modern air pressure leak testing changes the game entirely. By testing your loop with air before a single drop of liquid enters the system, you eliminate the risk of hardware damage.
The benefits of air leak testing:
- Zero Risk to Hardware: Air won’t short-circuit your RTX 4090 or your motherboard.
- Speed: What used to take 24 hours now takes about 15-30 minutes.
- Precision: A pressure gauge will show you even the tiniest micro-leak that might not drip water until the loop gets warm and pressurizes naturally.
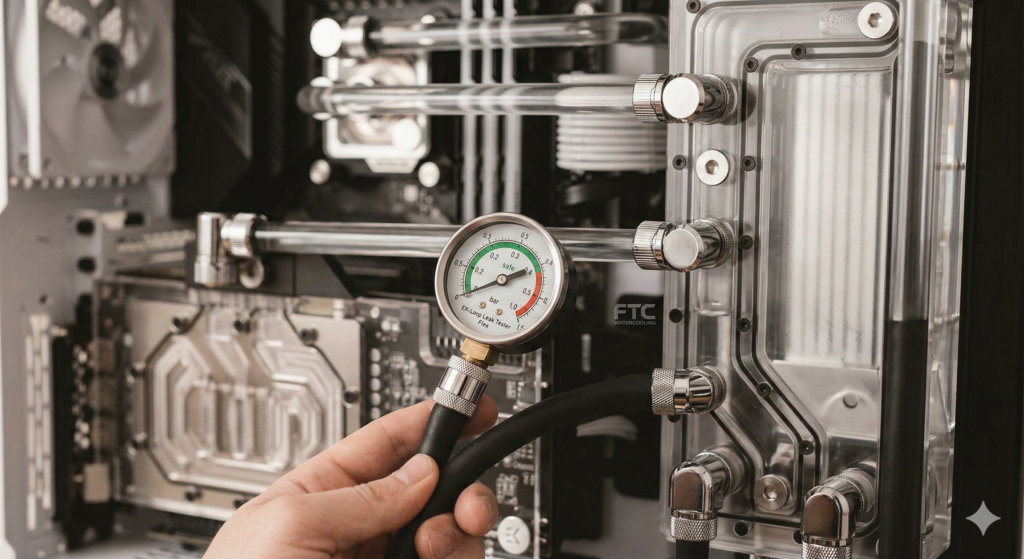
Enter the EK-Loop Leak Tester Flex
The EK-Loop Leak Tester Flex is one of our favorite tools in the shop. It works by pressurizing your empty watercooling loop with air. If the loop is sealed, the pressure holds steady. If there’s a leak, the pressure drops.
What makes the “Flex” version great is the flexible tubing between the pump and the gauge. In tight ITX builds or complex distribution block setups, finding a straight path for a rigid leak tester can be impossible. The flexible hose lets you thread the tester into almost any spare G1/4″ port.
Step-by-Step: How to Use the EK-Loop Leak Tester Flex
Ready to test your loop? Follow these steps to ensure your system is watertight.
Step 1: Prep the Loop
Ensure your watercooling loop is fully assembled, dry, and empty. Double-check that all fittings are finger-tight and any unused ports on your GPU blocks, CPU blocks, and reservoirs are plugged.
Step 2: Attach the Tester
Find a spare G1/4″ port on your loop. The top of your reservoir is usually the easiest spot. Screw the EK-Loop Leak Tester Flex securely into the port.
Step 3: Pressurize the System
Using the hand pump, add air to the system. Keep a close eye on the gauge.
- The Green Zone: The gauge features a safe “green zone” specifically calibrated for PC watercooling components.
- Stop at the right pressure: Aim for around 0.3 to 0.5 bar for a complete system test. Do not over-pressurize. Pumping too much air into the loop can blow out O-rings or crack acrylic components.
Step 4: The Waiting Game
Once you reach the desired pressure, stop pumping. Leave the system alone for 15 to 30 minutes.
Step 5: Read the Results
Check the gauge after your waiting period.
- If the needle hasn’t moved: Congratulations! Your loop is perfectly sealed and ready for coolant.
- If the needle has dropped: You have a leak. Don’t panic, this is exactly why we test with air!
Step 6: Depressurize
Before you unscrew the tester (or open any other ports to fix a leak), make sure to press the release valve on the tester to depressurize the loop.
What to Do If the Pressure Drops?
If your EK-Loop Leak Tester Flex indicates a leak, you need to find and fix it. Here are a few troubleshooting tips: the tester: Ensure the tester itself is screwed in tightly, and its own release valve is fully closed.
- Listen closely: Pump the system back up and put your ear near the fittings. Sometimes you can hear a faint hissing sound where the air is escaping.
- Check your fittings: Go around and ensure every fitting, rotary adapter, and stop plug is tightened.
- Isolate components: If you can’t find the leak, you may need to test components individually, such as the GPU block or radiators, to isolate the problem.
Final Thoughts from FTC Watercooling
Building a custom loop is an investment of time, money, and passion. The EK-Loop Leak Tester Flex is a small investment that pays for itself in peace of mind the first time you use it. Put away the paper towels, save yourself 24 hours of anxiety, and test smart.
Happy building, and keep those temps low!